
 |
|
 |
|
|
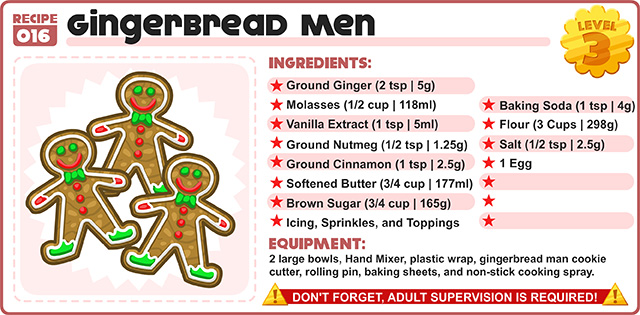
In a large bowl, add the cinnamon, nutmeg, ginger, baking soda, and flour. Mix them thoroughly and set the bowl aside for later use.
In a second large bowl, mix the brown sugar and the butter until the mixture is fluffy. It helps to have a hand mixer. Then add the egg, vanilla extract, and molasses and mix thoroughly.
Finally, add in the dry mixture from the first bowl slowly until everything is completely blended with no lumps and stuff. |
 |
|
|
Take your dough and divide it in half. Roll the halves into balls and cover each with plastic wrap. Let them chill in the refrigerator for 2 hours. |
 |
|
|
Prepare your work surface with a light dusting of flour so that the dough doesn’t stick to it. Take each ball of dough and roll it out until the dough sheets are 1/8th inch thick.
Dust your cookie cutter in flour and start cutting out as many gingerbread men as you can. This should make about 2 dozen depending on the size of your cutter. |
 |
|
|
Preheat your oven to 350° F. Spray the non-stick cooking spray on your cooking sheets. Place each gingerbread man on the sheets leaving 2 inches between each of them. Bake them for 8-10 minutes.
Let the cookies fully cool down after they are done baking. Once cool, decorate them with your icing, sprinkles, and any other festive toppings you like! |
|
|
|
 |
 |
|
|
 |
So last week, we had you make Red Velvet Cupcakes. Let’s see some examples:


 |
|
 |
|
|
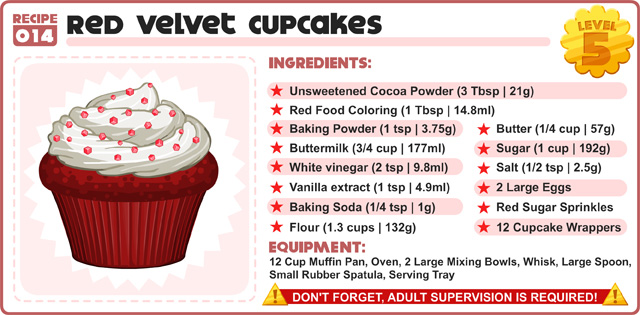
Papa Louie’s first introduction to Red Velvet was in Papa’s Cupcakeria. For this challenging recipe, we will be making them completely from scratch! You ready for this??
First step is to preheat your oven to 350°F (175°C) so it’s all ready to go by the time you’re ready to put them in the oven. At this time, you can also place the 12 cupcake wrappers in the Muffin Pan. |
 |
| 2: Mixing the Ingredients |
|
|
First, you’ll want to mix together some of the dry ingredients in a large mixing bowl. This includes the flour, cocoa, baking soda, baking powder, and salt.
In a second mixing bowl, add the sugar and the butter. It helps if the butter is soft and close to room temperature. Whisk the butter and sugar together until it’s fully mixed and creamy. Then add the 1 egg and mix it in thoroughly, then add the second egg and do the same. This is followed by adding the buttermilk and vinegar and whisking them until fully blended with the rest of these wet ingredients. Finally, add the vanilla extract and red food coloring and mix it some more.
Pour the dry ingredients into the wet ingredients bowl and whisk until the batter is velvety smooth. |
 |
|
|
Spoon the batter into each of the cupcake wrappers within the pan. Each wrapper should be filled 3/4th of the way.
Once the oven is pre-heated, bake the cupcakes for 20 to 25 minutes. You’ll know they are done if you poke a toothpick into the center, pull it out, and it’s clean. |
 |
|
|
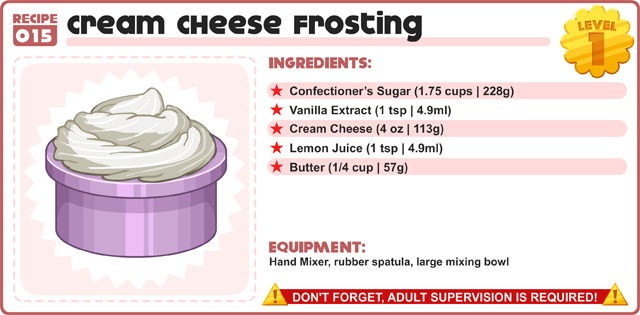
Traditional Red Velvet Cupcakes are topped with Cream Cheese Frosting. For this Cook Book post, we’ve included an additional recipe sheet for homemade Cream Cheese Frosting. For this step you will be using the additional tools and ingredients found on that sheet. You can also skip this step if you prefer regular store-bought frosting, but you’ve made it this far… why not go all in!
In a large mixing bowl, add butter (soft and room temperature), cream cheese, vanilla extract, and lemon juice. Using a hand mixer, blend until everything is nice and smooth.
Then add the Confectioner’s Sugar to the mix and keep blending until the frosting is fluffy. Refrigerate the frosting for 30 min to allow it to firm up before putting it on the cupcakes. |
 |
|
|
Remove the pan from the oven and let them sit for 10 minutes. Traditionally, Red Velvet cupcakes are served without a wrapper, so if you want, unwrap the cupcakes before frosting.
Frost the Cupcakes and dust with the Red Sugar Sprinkles. If you are planning on making the Cream Cheese Frosting, I find it helps to put the finished frosting in a small ziplock bag. Then cut one of the bottom corners off the bag to make an easy frosting dispenser. Simply squeeze the frosting through the hole and onto the cupcakes. |
|
|
|
 |
 |
|
|
 |
So last week, we had you make a Chocolate Acorns. Let’s see some fan-made examples:


 |
|
 |
|
|
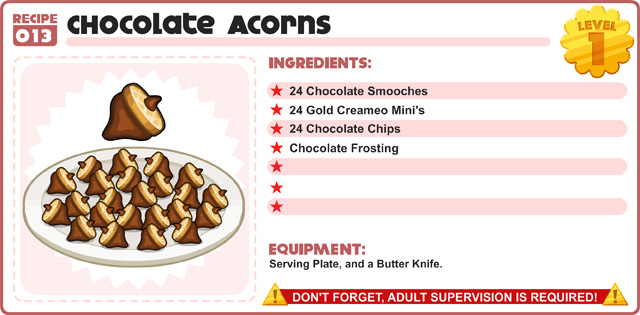
As Thanksgiving approaches, we have a real easy, real fun, and real tasty treat to celebrate the holiday. Chocolate Acorns made their first appearance in Papa’s Cupcakeria. Each acorn is made of 3 separate parts and glued together with chocolate frosting. Finding those parts will be the only challenge here. First you will need to find 24 chocolate chips and some chocolate frosting. Then you will need 24 Gold Creameo Mini’s, although you may have better luck looking for other brands like Nutter Butter Bites, Ritz Peanut Butter Mini’s, etc. Basically any small cookie or cracker that is about an inch in diameter. Next you will need Chocolate Smooches, you know, kisses, buds, drops, whatever you might call them, you’ll need 24. |
 |
|
|
If you are using mini sandwich cookies, you’ll want to first separate them and scrape off any residual frosting. Then dab some of the new chocolate frosting onto the flat/previously-frosted side of the cookie. Then, unwrap your Chocolate Smooch and stick it onto the cookie using the chocolate frosting as glue. Finally, take a small chocolate chip, coat the flat bottom in chocolate frosting, and stick it on the other side of the cookie so it looks like the acorn’s stem. |
 |
|
|
You’ll want to let them dry for a bit to make sure that frosting holds everything together. After that, you’ll have a tasty treat for after your Thanksgiving Feast!! |
|
|
|
 |
 |
|
|
 |
Let’s see some new example of past recipes:


